RON KAMPHUIS
Technical Artist / Environment Artist
TEXTURE MANAGER
Photoshop Script
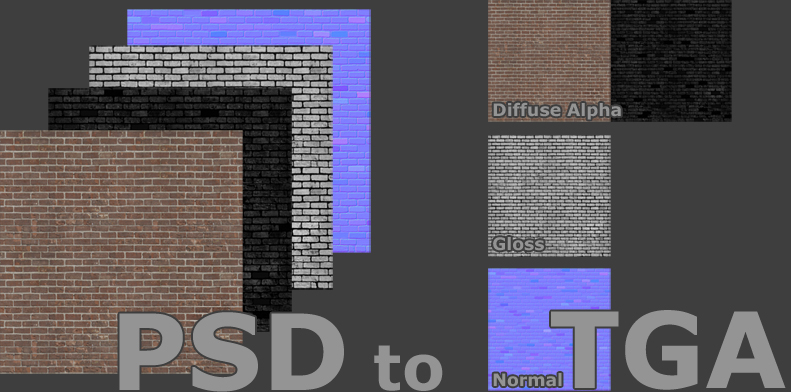
Texture manager is a tool for Photoshop to quickly save your different texture groups from a PSD. It makes managing your source files and exporting them to target files a lot easier.
It has an integrated Perforce plugin so it can also checkout and/or add files easily.
It has an integrated Perforce plugin so it can also checkout and/or add files easily.
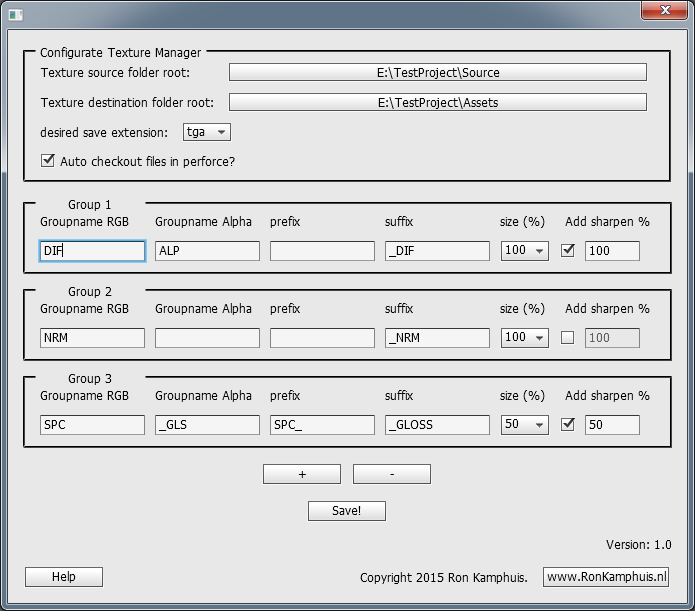
HOW TO USE
Texture source folder root - This is where you define your PSD location root. This could be the root of your assets source in your project.
The script understands subfolder structures so you normally only have to set this once.
Texture destination folder root - This is where you define your output location root. This could be the root of your assets in your project.
The folder structure behind this folder should be similar to the texture source root.
Desired save extension - Choose between tga, bmp, jpg or png. Please note that only tga supports alpha channels.
Auto checkout files in perforce. - If you have a perforce integration, this should automatically checkout the file or add it if it's new. It will also checkout or add your PSD.
You can define up to 8 groups with presets. These groups control the PSD group behaviour. Behaviour is as follows:
Groupname RGB - The group in your PSD with this name will be placed in the RGB slot.
Groupname Alpha - The group in your PSD with this name will be placed in the Alpha slot. Leave empty if no alpha is wanted.
prefix - A prefix that will be added to the beginning of your target texture name. Leave this empty to ignore a prefix.
suffix - A suffix that will be added to the end of your target texture name. Leave this empty to ignore a suffix.
size (%) - Resize the target texture by X%.
Add sharpen % - Add a sharpen filter to your target texture and apply it with X%
+ and -: Use these buttons to increase or decrease the number of groups you want. There is a maximum of 8 groups.
Save - Save the preferences.
TUTORIAL MOVIE
Down here you will find a movie of the script in action. It is a movie of an early version without a sharpen option, but it will show you all the other features.
If you have any questions about the script then feel free to email me.
If you have any questions about the script then feel free to email me.
GENERAL INFO
INSTALLATION GUIDE
Unzip all content to your Photoshop/Presets folder. (Default C:/Program Files/Adobe/Photoshop_version/Presets)
Launch Photoshop
You can now use the script via the File --> Scripts menu.
To install the quick actions shotcuts do the following:
Execute the file TextureManager.atn from your Presets/Actions folder by double clicking it.
You should now have 8 actions for all the groups in your action window. (Window --> Actions)
By default the actions are binded to F5 - F12.